
public static void main(String[] args) {
}//main
지금까지는 이러한 메인 부분 안에서 코드를 진행했는데
이제는 class 부분에 메소드를 정의하고 main에서는 메소드를 호출하기만 하는 식으로 진행합니다
이렇게 하는 이유는 다양한 메소드를 정의하는 class 따로,
그런 메소드들을 호출하여 출력하는 main메소드 따로 작성함으로서
구조를 잘 짜기 위해서인 것 같네요
*클래스작성
1.대상선정
2.객체모델링(추상화)
3.클래스작성
4.객체생성
5.객체사용

package day0123;
/**
* Polymorphism : 다형성
* - 클래스안에서는 같은 이름의 method를 하나만 정의할 수 있다
*/
public class Overload {
/**
* 별 하나를 출력하는 일
*/
public void printStar() {
System.out.println("★");
}
/**
* 별을 입력한 개수로 출력하는 일
* method Overload
* @param starCnt 출력할 별의 개수
*/
public void printStar(int starCnt) {
for(int i=0; i <5 ; i++) {
System.out.print("☆");
}//end for
}//printStar
public static void main(String[] args) {
Overload o1=new Overload();
o1.printStar();
o1.printStar(2);
}//main
}//class
콘솔 출력
★
☆☆☆☆☆
package day0123;
/**
* variable arguments가 도입된 console 출력 method 사용
*/
public class UsePrintf {
public void useVariableArguments() {
int year=2025, month=1, day=23;
System.out.printf("정수출력%d\n",year);
System.out.printf("정수 자릿수 출력[%6d]\n",year);
System.out.printf("정수 자릿수 출력[%-6d]\n",year);
System.out.printf("오늘은 %d년 %d월 %d일 입니다.\n",year,month,day);
char c='A';
System.out.printf("문자 [%c][%3c][%-3c]\n",c,c,c);
double d=2025.01;
System.out.printf("실수출력 %f\n",d);
d=12.1234;
System.out.printf("실수 자릿수 출력 [%10.2f]\n",d);
System.out.printf("실수 소수점만 조절 출력 [%.2f]\n",d);
boolean b=true, b2=false;
System.out.printf("불린출력 %b, %b\n",b, b2);
System.out.printf("불린 자릿수 출력 [%6b], [%-8b]\n",b, b2);
String name=" devlogin ";
System.out.printf("문자열 출력 %s\n",name);
System.out.printf("문자열 자릿수 출력 [%5s][%-5s]\n",name,name);
}//useVariableArguments
public static void main(String[] args) {
UsePrintf up=new UsePrintf();
up.useVariableArguments();
}//main
}//class
콘솔 출력
정수출력2025
정수 자릿수 출력[ 2025]
정수 자릿수 출력[2025 ]
오늘은 2025년 1월 23일 입니다.
문자 [A][ A][A ]
실수출력 2025.010000
실수 자릿수 출력 [ 12.12]
실수 소수점만 조절 출력 [12.12]
불린출력 true, false
불린 자릿수 출력 [ true], [false ]
문자열 출력 devlogin
문자열 자릿수 출력 [ devlogin][devlogin ]
*Constructor (생성자)
- 객체가 클래스로 부터 생성될 때 기본적으로 가지고 있어야 할 값이나, 실행되어야할 코드를
정의하는 method의 일종.
- 직접 호출되지 않는다. ( new에 의해서만 호출 )
- 상속되지 않는다.
- 클래스의 이름과 동일하게 만들어지고 (대문자로 시작), 반환형이 없다.
- this나 super를 사용하여 클래스 내에 다른 생성자를 호출할 수 있다.
- Overload가 된다. ( 객체를 다양하게 생성할 수 있다.)
- 개발자가 생성자를 하나도 정의하지 않으면 compiler가 매개변수 없는 기본생성자
(default constructor)를 생성해준다. 개발자가 생성자를 하나라도 정의하면 compiler는
기본생성자를 생성하지 않는다.
문법)
접근지정자 클래스명( 매개변수,,,, ){
//객체가 생성될 때 기본적으로 가지고 있어야 할 값
//객체가 생성될 때 실행되어야 할 코드 정의
}
public : 클래스 외부에서 객체 생성 가능.
protected : 같은 패키지의 다른 클래스에서 객체 생성가능
패키지가 다르면 상속관계의 자식클래스에서 객체 생성가능.
default : 같은 패키지의 다른 클래스에서 객체 생성가능.
패키지가 다르면 객체 생성불가
private : 클래스 안에서만 객체 생성가능. ( singleton pattern을 적용하여 클래스를 생성 )
*default constructor
- 매개변수가 없고 클래스의 접근지정자와 동일한 접근지정자를 가진 생성자.
class Test{
}
public class Test{
}
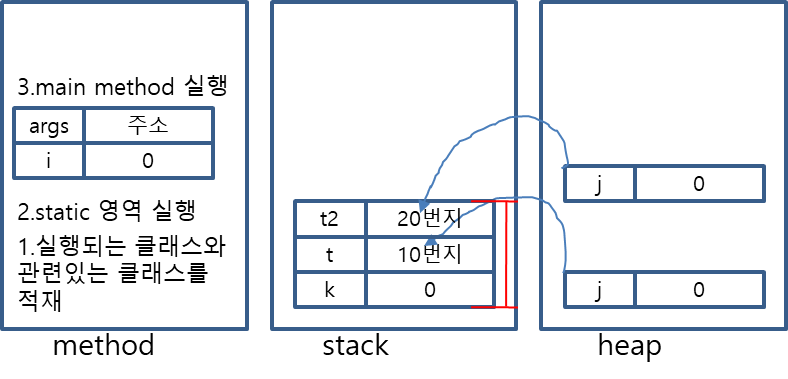
*JVM Memory
- method영역 : 실행되는 코드가 적재, static 변수가 저장, 가장먼저 실행.
- stack 영역 : 지역변수가 저장.
- heap영역 : instance 변수가 저장, new 로만 사용가능. ( instance ,객체 )
class Test{
static int i;
int j;
public static void main(String[] args){
int k=0;
Test t=new Test();
Test t2=new Test();
}
}
package day0124;
/**
* 생성자의 사용.
*/
public class TestConstructor {
public TestConstructor() {
System.out.println("default constructor!!");
}//TestConstructor
public TestConstructor(int i) {
System.out.println("오버로드된 매개변수 있는 생성자!!");
test(); //method 직접 호출했음.
}//TestConstructor
public void test() {
System.out.println("test method!!");
}//test
public static void main(String[] args) {
new TestConstructor(10); //생성자는 new 로만 부를 수 있고
// TestConstructor(); //method 호출하듯이 직접호출 할 수는 없다.
}//main
}//class
콘솔 출력
오버로드된 매개변수 있는 생성자!!
test method!!
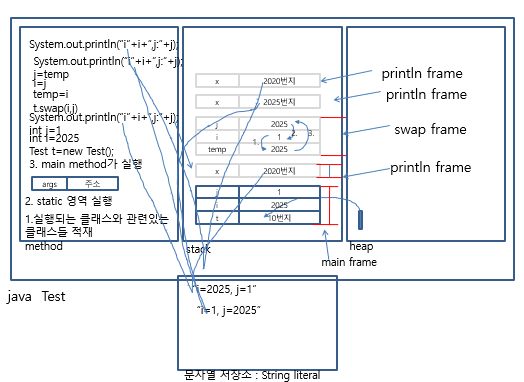
*값 복사 ( Call by Value)
- method의 매개변수로 기본형이 선언되어있으면, 값은 복사되어 전달된다.
public class Test{
public void swap( int i, int j){
int temp=0;
temp=i;//2025 , 2025
i=j;//1, 1
j=temp;//2025, 2025
System.out.println( “swap method안 i : “+ i +”, j :”+j );// i=1, j=2025
}//swap
public static void main(String[] args){
Test t=new Test();
int i=2025;
int j=1;
System.out.println( “swap method 전 i : “+ i +”, j :”+j ); //i=2025, j=1
t.swap( i, j );
System.out.println( “swap method 후 i : “+ i +”, j :”+j );// i=2025, j=1
}
}
package day0124;
/**
* method의 매개변수가 기본형 데이터 형으로 선언되어 있다면 할당되는 값은 복사되어 들아간다.
*/
public class CallByValue {
public void swap ( int i, int j) {
int temp=0;
temp=i;
i=j;
j=temp;
System.out.printf("swap method 안의 i = %d, j = %d\n",i,j);
}//swap
public static void main(String[] args) {
CallByValue cbv=new CallByValue();
int i=2025;
int j=1;
System.out.printf("swap method 호출 전 i = %d, j = %d\n",i,j);
cbv.swap(i, j);;
System.out.printf("swap method 호출 후 i = %d, j = %d\n",i,j);
}//main
}//class
콘솔 출력
swap method 호출 전 i = 2025, j = 1
swap method 안의 i = 1, j = 2025
swap method 호출 후 i = 2025, j = 1
*this
- 키워드 형식, method 형식으로 사용할 수 있다.
*keyword형식
- method를 호출하는 instance(객체) 의 주소로 변경된다. t.setI()
- 객체가 생성된 후 호출되는 instance 영역에서만 사용할 수 있다.
( 객체를 사용하지 않고 클래스명.method()명으로 호출되는 static 영역에서는 사용할 수 없다.)
-instance 변수명과 pameter 명이 같을 때, 두 변수를 식별하기위해서 사용.
this.변수명 => heap에 생성되는 instance 변수명
변수명 => stack에 생성되는 local 변수명
-상속관계에서는 자식의 변수와 부모의 변수의 이름인 같은 이름을 가지거나
자식 method명과 부모의method명이 같을 경우에도 식별하기 위해서 사용한다.
사용법)
-변수
this.변수명
-method호출
this.method명()
class Test{
int i;
public void setI( int i ){
this.i=i;
}
public static void main(String[] args){
Test t=new Test();//heap에 생성하고, heap에 주소를 stack 할당
t.setI( 100 ); //t (heap주소) 10번지를 사용하여 setI method 호출 해줘!
Test t2=new Test();
t2.setI(20);
}
}
package day0124;
public class Reference2 {
int i;
int j;
public void setJ(int j) {
this.j=j; //this 의 사용법
System.out.println(j);
}
public void setI (int i,Reference2 r) {
System.out.println("setI에서 받은 객체 : "+r);
System.out.println("setI에서 받은 객체 : "+this);
r.i=i; //stack에 있는 i 변수를 heap에 있는 i에 할당
// i=i; //그대로
}//swap
public int getI() {
return i;
}
// public static void method() {
// System.out.println(this); //static 안에서는 this 사용 x
// //호출하려는 객체의 정보를 찾을 수 없음
// }
public static void main(String[] args) {
Reference2 r=new Reference2();
System.out.println("생성된 객체 : " + r);
r.setI(2025, r);
r.setJ(20);
System.out.println(r.getI());
// System.out.println(r.getJ());
}
}
콘솔 출력
생성된 객체 : day0124.Reference2@1f32e575
setI에서 받은 객체 : day0124.Reference2@1f32e575
setI에서 받은 객체 : day0124.Reference2@1f32e575
20
2025
Resident, printResident 이렇게 2개의 클래스를 통해 메소드와 호출을 익혀보았습니다
package day0131;
public class Resident {
private String id;// 주민번호
/**
* 작업1 : 기본 생성자
* @param num 설정할 주민번호
*/
public Resident(String id) {
this.id = id;
}// IdNumber
public void setNum(String id) {
this.id = id;
}// setNum
public String getNum() {
return id;
}// getNum
/**
* 작업2 : 글자수 14개 확인
*
* @return
*/
public boolean length() {
return id.length() == 14;
}// boolean length
/**
* 작업3 : 6번째에 '-' 가 있는지 확인
*
* @return
*/
public boolean check() {
return id.charAt(6) == '-';
}// check
/**
* 작업4 : 주민번호 앞자리로 년대 파악
*
* @return
*/
public String change() {
String yearFirst = "";
char century = id.charAt(7);
if (century == '1' || century == '2' || century == '5' || century == '6') {
yearFirst = "19";
} else if (century == '3' || century == '4' || century == '7' || century == '8') {
yearFirst = "20";
} else if (century == '0' || century == '9') {
yearFirst = "18";
}
String year = yearFirst + id.substring(0, 2);
String month = id.substring(2, 4);
String day = id.substring(4, 6);
return year + "년" + month + "월" + day + "월";
}// change
/**
* 작업 5 나이를 계산하여 변환
* @return
*/
// public int Age() {
//
// if
// 주민번호 앞2자리가 26보다 클 때
// 2025- (1900+주민앞2) + 1
// else
// 2025 - (2000+주민앞2) +1
//
// }//Age
/**
* 작업 6 성별 확인
*
* @return
*/
public String genderCheck() {
char gender = id.charAt(7);
return (gender == '1' || gender == '3' || gender == '5' || gender == '7' || gender == '9') ? "남자" : "여자";
}// gender
/**
* 작업 7 내/외국인 확인
*
* @return
*/
public String nationalCheck() {
char national = id.charAt(7);
return (national == '0' || national == '1' || national == '2' || national == '3' || national == '4'
|| national == '9') ? "내국인" : "외국인";
}// nationalCheck
/**
* 작업 8 띠 변환
*
* @return
*/
public String zodiac() {
String[] zodiacSigns = { "원숭이", "닭", "개", "돼지", "쥐", "소", "호랑이", "토끼", "용", "뱀", "말", "양" };
int birthYear = Integer.parseInt(change().substring(0, 4));
return zodiacSigns[birthYear % 12];
}
}// class
package day0131;
public class printResident {
public static void main(String[]args) {
String ssn = "000123-4567890"; // 주민등록번호
Resident id = new Resident(ssn);
if (id.length()) { // 길이 체크
if (id.check()) { // '-' 위치 체크
System.out.println("생년월일: " + id.change());
// System.out.println("나이: " + id.작업5());
System.out.println("국적: " + id.nationalCheck());
System.out.println("성별: " + id.genderCheck());
System.out.println("띠: " + id.zodiac());
} else {
System.out.println("'-'가 올바른 위치에 존재하지 않습니다.");
}
} else {
System.out.println("주민번호의 길이가 맞지 않습니다.");
}
}// main
}// class
콘솔 출력
생년월일: 2000년01월23월
국적: 내국인
성별: 여자
띠: 용
'Java' 카테고리의 다른 글
| [Java] StringBuilder 등 유용한 클래스들 import하기 (0) | 2025.03.17 |
|---|---|
| [Java] Array,Variable Array (0) | 2025.03.16 |
| [Java] Method - Instance ,Static,Variable 및 4가지 형태 (0) | 2025.03.13 |
| [Java] 제어문( if, switch~case, for, while, do, continue, return,break),Variable (0) | 2025.03.12 |
| [Java] 이클립스 자바 코딩 연습(기본 문법,데이터 형,최대,최소,연산자) (0) | 2025.01.29 |